In previous tutorials of docker we learned about how we can create a container out of the ready made image that we can pull from the dockerhub. However in this tutorial we will learn how to create our own image and container out of the image.
We will use following steps to create our own image:
- Define a docker configuration file called Dockerfile in our project
- Dockerfile contains steps that will be followed by docker server
- Docker server will do all the work and create a usable image for us
- We take our usable image and create a container out of it.
Creating a docker image
To create our own image we first need to learn little bit about docker configuration file called Dockerfile. We will use dockerfile to define some steps which can be later on used by docker server to create our own image.
To create our own image we need to consider the following diagram:

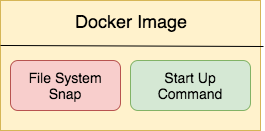
Until so far we know that a docker image essentially contains two things:
- File System SnapShot
- Start Up Command (Optional)
Let's start creating our first image. Let's open up your terminal window and start writing following commands:
# let's create a new project directory
mkdir docker-test

# change directory
cd docker-test

# create a docker config file
touch Dockerfile
Now, let's look at what to define in our newly created dockerfile. A Dockerfile usually contains following steps:
- Base Image
- Some commands to run
- Startup Command
In this tutorial we will create an image that runs a redis-server when container starts up. Let's open our newly created Dockerfile and add following lines of code keep an eye on comments line to understand what is going on:
# Use existing image from docker hub
FROM alpine

# Download and install some dependencies
RUN apk add --update redis

# Tell the image what to do when we start
# Our container created from this image
CMD ["redis-server"]
Let's review what we have done in above dockerfile:
- FROM base_image
- RUN some commands on top of the existing image
- CMD a startup command
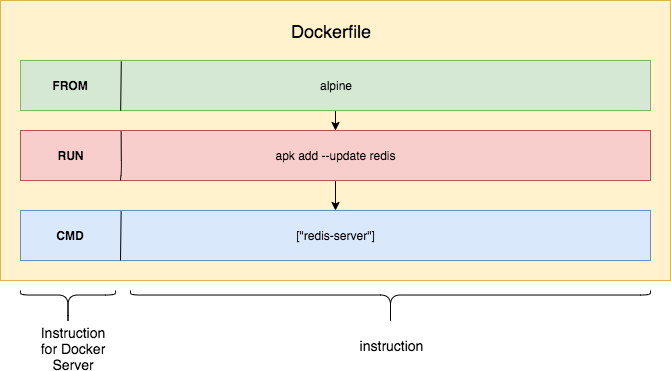
First line in the file starts with FROM alpine. Alpine is a bare minimum linux image reside on dockerhub. We take this linux image and install redis using RUN command. Once we have our dependency downloaded we then run CMD command that tells docker image to run specified command when it starts the container from this image.
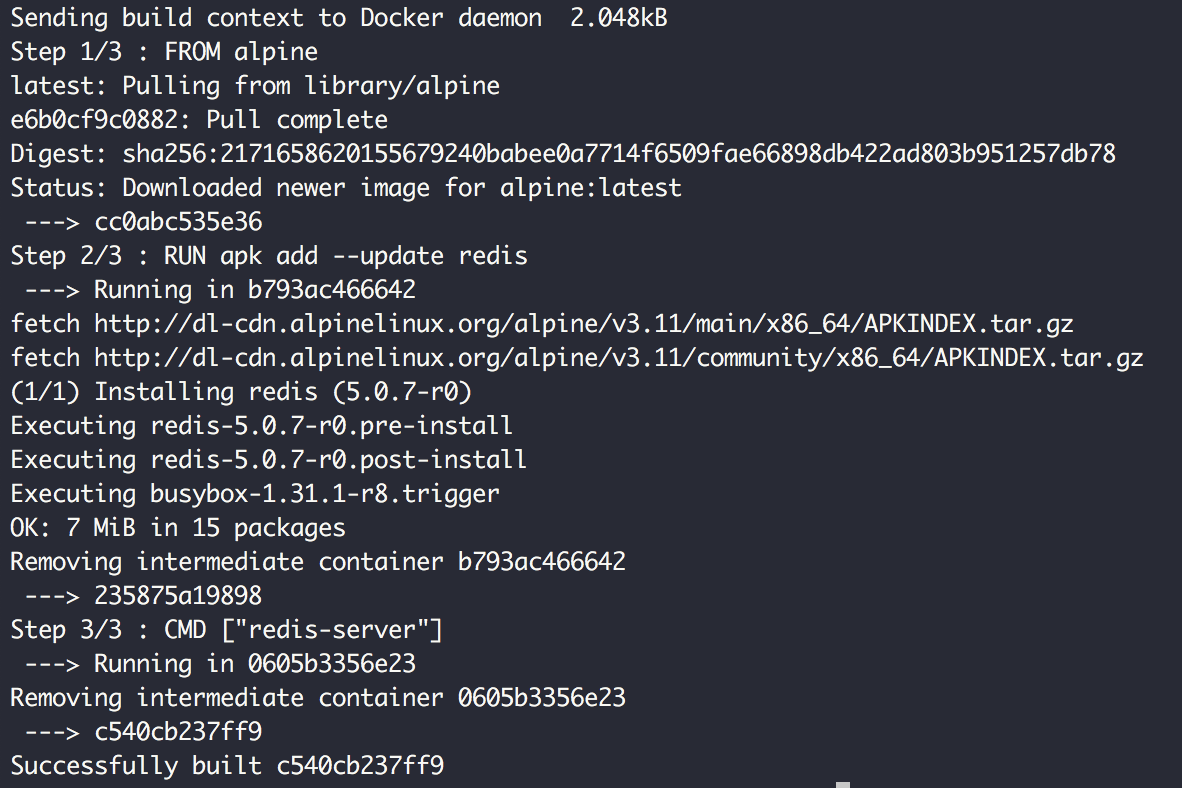
Let's now build our image using following command:
# build our custom image
docker build .
Make sure you run above command in the same directory where your Dockerfile is located. This will output with following:
We will take the newly created image id and create and start a container from our custom image:
# Run a forground process
docker run c540cb237ff9

#### OR #################

# Run container in background
docker run -d c540cb237ff9

# To view running containers in background
docker ps
Once you create and start a container using above command you will see following output on your screen:

You can run container either in
- forground or
- background
When you run a container without -d option it will create a forground process and you have to kill the process to exit by pressing cmd + c or Ctrl + C. That is it now we know how to build and run a new custom docker image.
What is a base image?
Docker base image is basically a docker image residing on dockerhub with minimal configurations so that you can take this base image and more stuff to it and build your custom image as per your project requirements.
For example, if you are working on building a docker container for your nodejs project you first need to install nodejs. Docker images are based on linux file system therefore you need to have bare minimum linux os to further install nodejs on top of it.
You take alpine image which is a minimal Docker image based on Alpine Linux with a complete package index and only 5 MB in size! Then you install nodejs on top of this image and make it your custom image.
Build process in details
If you observe the build process for our custom image then you will notice following lines:
- Step 1/3 : FROM alpine
- Status: Downloaded newer image for alpine:latest
- ---> cc0abc535e36
- Step 2/3 : RUN apk add --update redis
- ---> Running in b793ac466642
- Removing intermediate container b793ac466642
- Step 3/3 : CMD ["redis-server"]
- ---> Running in 0605b3356e23
- Removing intermediate container 0605b3356e23
- ---> c540cb237ff9
- Successfully built c540cb237ff9
Let's learn what is going on here by following diagram:
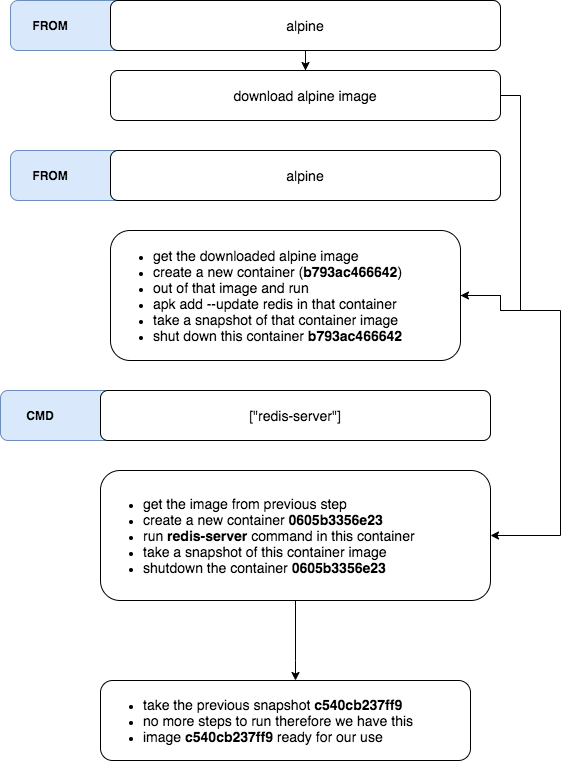
When docker server executes the commands we mentioned in Dockerfile following things happen:
- First it downloads the alpine image and store in a temp image cc0abc535e36
- During step2 of the process it takes this image cc0abc535e36 and run apk add --update redis command by creating a new temp container b793ac466642. Then it takes thesnapshot of this container image and stores it temporarily
- Step-3: it takes this stored temp image and runs redis-server command and creates a new container. It takes the snapshot of this newly created container image and have it ready for the next step
- However there are no further steps to follow it stops right there and make c540cb237ff9 image ready for our custom use.
The reason why it is doing this because as we know a container image basically has two things:
- A snapshot of file system
- A startup command
When we run each steps it takes the snapshot of the current image and run a new startup command and creates a container out of it. Once we take a snapshot of this modified image we can use it for our next step.